Here is how to add a view counter and minute read into your Next.js 14 Blog.
This was inspired by Andreas' blog post, which was inspired by Lee's blog. However, it was published on April 3rd, 2023 and there have been a few updates since then. I wanted to share how I was able to get it to work with Next.js 14. And also include how to add minute read.
Prerequisites
- An Upstash account
- A Next.js 14 project (will have an example one if you don't have one)
Setting up our Next.js 14 project
You can find the starter and final code here.

If you already have a repository that you are trying to add the view counter to, you can add the package below with your desired package manager.
bun add @upstash/redis
Setting up Upstash Redis
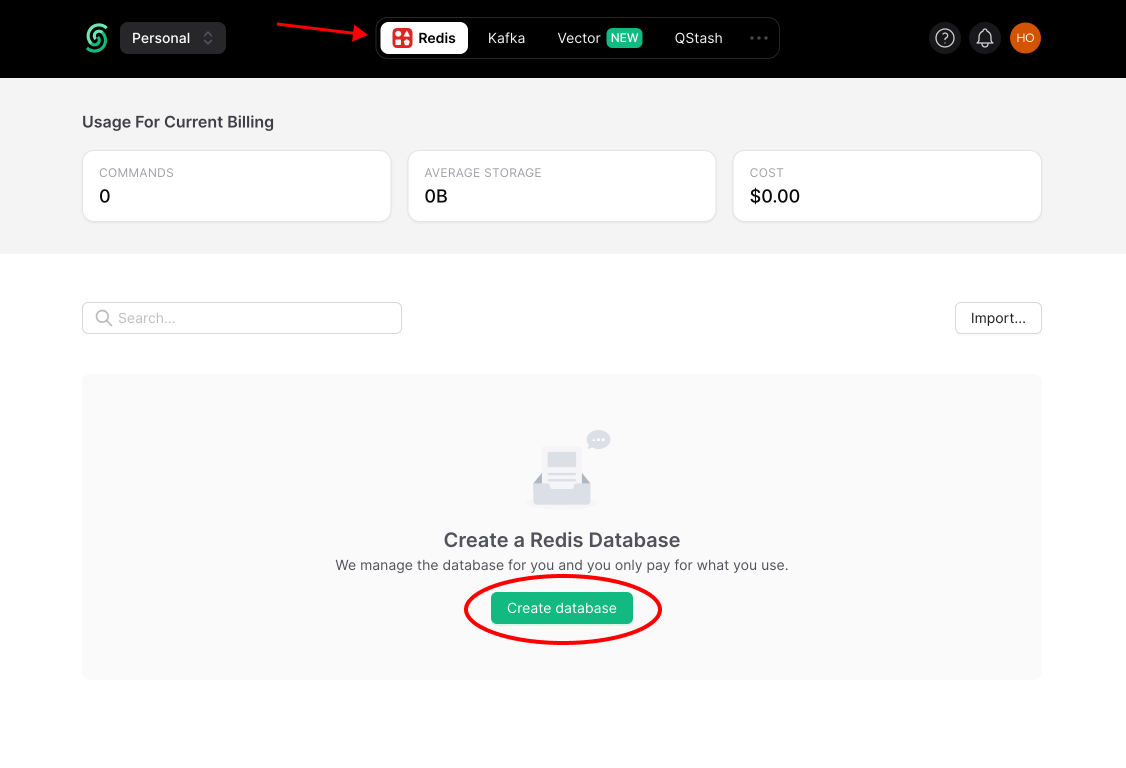
Go to Upstash, login or create an account. In the dashboard make sure you are on the Redis tab, and click Create database.
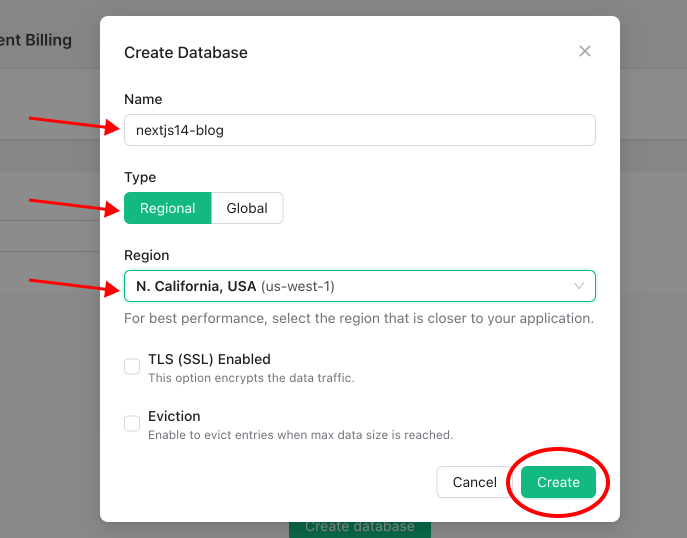
Enter in the Name, select the Type and Region and click Create.
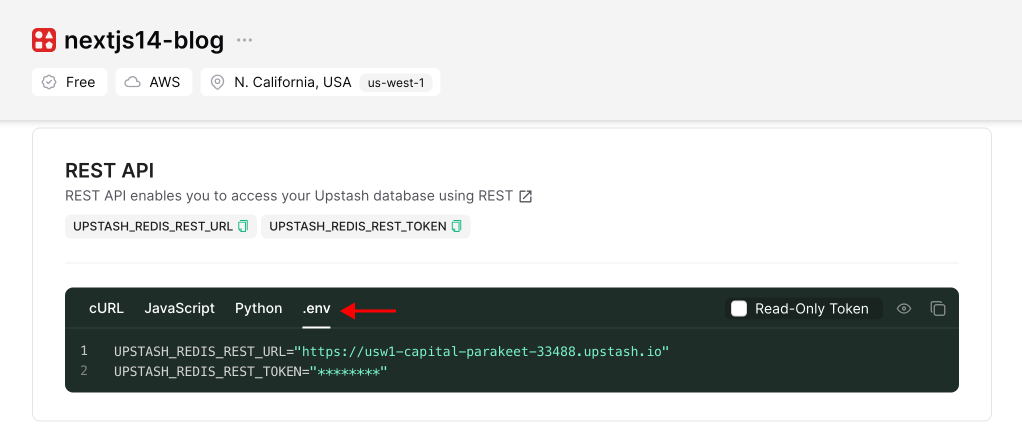
When the database is finished being created, scroll down in the project dashboard to the REST API section. Click on .env and add UPSTASH_REDIS_REST_URL and UPSTASH_REDIS_REST_TOKEN into the .env file in the project.
Folder Structure
├── src
|   ├── app
|   |   ├── api
|   |   |   ├── increment
|   |   |   |   |   ├── route.ts
|   |   ├── posts
|   |   |   ├── [slug]
|   |   |   |   |   ├── page.tsx
|   |   |   |   |   ├── view.tsx
|   |   |   |   ├── page.tsx
|   |   |   |   ├── posts.tsx
|   |   |   ├── favicon.ico
|   |   |   ├── layout.tsx
|   |   |   ├── page.tsx
...
View Counter
There are two things we want to do, (1) see how many views a blog post has and (2) increment the view each time someone visits the page.
Viewing
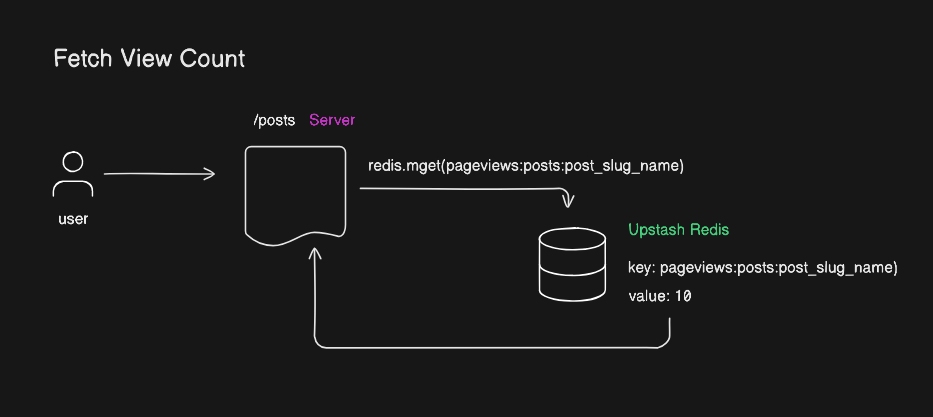
Here is a high level diagram drawn with eraser.io. This shows the src/app/posts/page.tsx and how it fetches the views for each post.
And here is the code.
import React from 'react';

import { getPosts } from '@/lib/posts';
import { Redis } from '@upstash/redis';

import Posts from './posts';

const redis = Redis.fromEnv();
export const revalidate = 0;

export const metadata = {
  title: 'Posts',
  description: '',
};


export default async function PostsPage() {
  let allPosts = getPosts();
  const views = (
    await redis.mget<number[]>(
      ...allPosts.map((p) => ['pageviews', 'posts', p.slug].join(':')),
    )
  ).reduce(
    (acc, v, i) => {
      acc[allPosts[i].slug] = v ?? 0;
      return acc;
    },
    {} as Record<string, number>,
  );
  return <Posts allPosts={allPosts} views={views} />;
}
We are going through each post in allPosts, fetching the value from the Upstash Redis database and inputting it into our Posts component.
The same method is used here. But since we have the slug for the post it makes it simplier to get the value.
import { cache, Suspense } from 'react';

import type { Metadata } from 'next';
import Link from 'next/link';
import { notFound } from 'next/navigation';

import MaxWidthWrapper from '@/components/max-width-wrapper';
import { CustomMDX } from '@/components/mdx';
import { getPosts } from '@/lib/posts';
import { calculateReadingTime, reformatDate } from '@/lib/utils';
import { Redis } from '@upstash/redis';
import { ArrowLeft } from 'lucide-react';
import { ReportView } from './view';

const redis = Redis.fromEnv();
export const revalidate = 0;

export default async function PostsPage({ params }: { params: any }) {
  const post = getPosts().find((post) => post.slug === params.slug);

  if (!post) {
    notFound();
  }
  const views =
    (await redis.get<number>(['pageviews', 'posts', params.slug].join(':'))) ??
    0;

  return (
    <MaxWidthWrapper>
      <ReportView slug={post.slug} />
      <div className="flex flex-row space-x-4 mb-6 text-sm text-secondaryDarker">
        <Link
          href="/posts"
          className="group flex flex-row items-center space-x-1"
        >
          <ArrowLeft
            size={18}
            className="group-hover:-translate-x-1 duration-300 group-hover:text-secondaryDark"
          />
          <span className="group-hover:text-secondaryDark duration-300">
            Back
          </span>
        </Link>
      </div>
      <h1 className="title font-medium text-2xl tracking-tighter max-w-[650px]">
        {post.metadata.title}
      </h1>
      <div className="flex justify-between items-center mt-2 mb-8 text-sm max-w-[650px]">
        <div className="flex flex-row space-x-2 items-center text-secondaryDarker">
          <span>{reformatDate(post.metadata.publishedAt)}</span>
          <span className="h-1 w-1 bg-secondaryDarker rounded-full" />
          <span>
            <span>
              {Intl.NumberFormat('en-US', { notation: 'compact' }).format(
                views,
              )}{' '}
              {' views'}
            </span>
          </span>
          <span className="h-1 w-1 bg-secondaryDarker rounded-full" />
          <span>
            <span>
              {calculateReadingTime(post.content)}
              {' min read'}
            </span>
          </span>
        </div>
      </div>
      <article className="prose prose-invert pb-10">
        <CustomMDX source={post.content} />
      </article>
    </MaxWidthWrapper>
  );
}
Incrementing
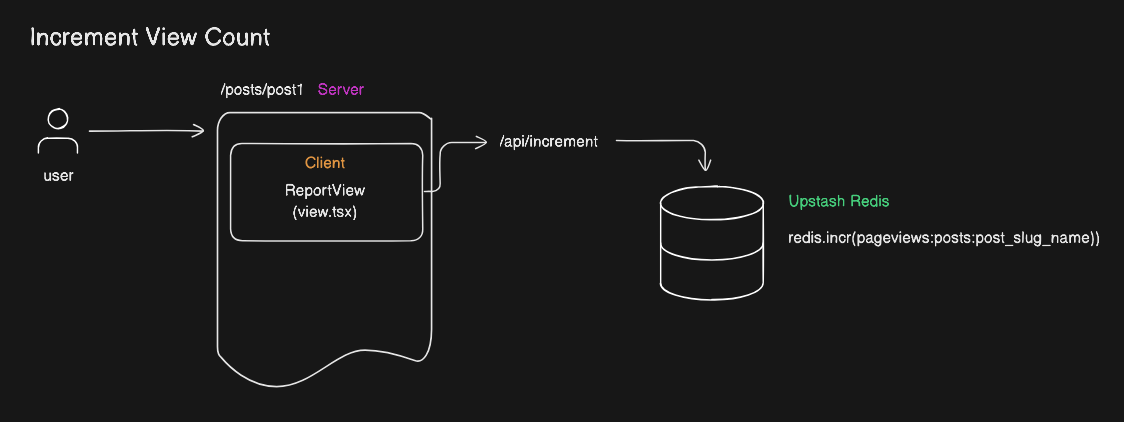
Here is a high level diagram drawn for incrementing. The only time we want to increment is when we visit the blog post.
Add Minute Read
For minutes read, since we have the content of the mdx, we can pass it into a function and use a formula to determine how many minutes it would take to read.
export function calculateReadingTime(mdxContent: any) {
  // Define the average reading speed (words per minute)
  const wordsPerMinute = 200;

  // Strip MDX/HTML tags and count the words
  const text = mdxContent.replace(/<\/?[^>]+(>|$)/g, '');
  const wordCount = text
    .split(/\s+/)
    .filter((word: any) => word.length > 0).length;

  // Calculate reading time
  const readingTime = Math.ceil(wordCount / wordsPerMinute);

  return readingTime;
}
Conclusion
Congratulations! You just have added a view counter and a minute read to you Next.js blog.